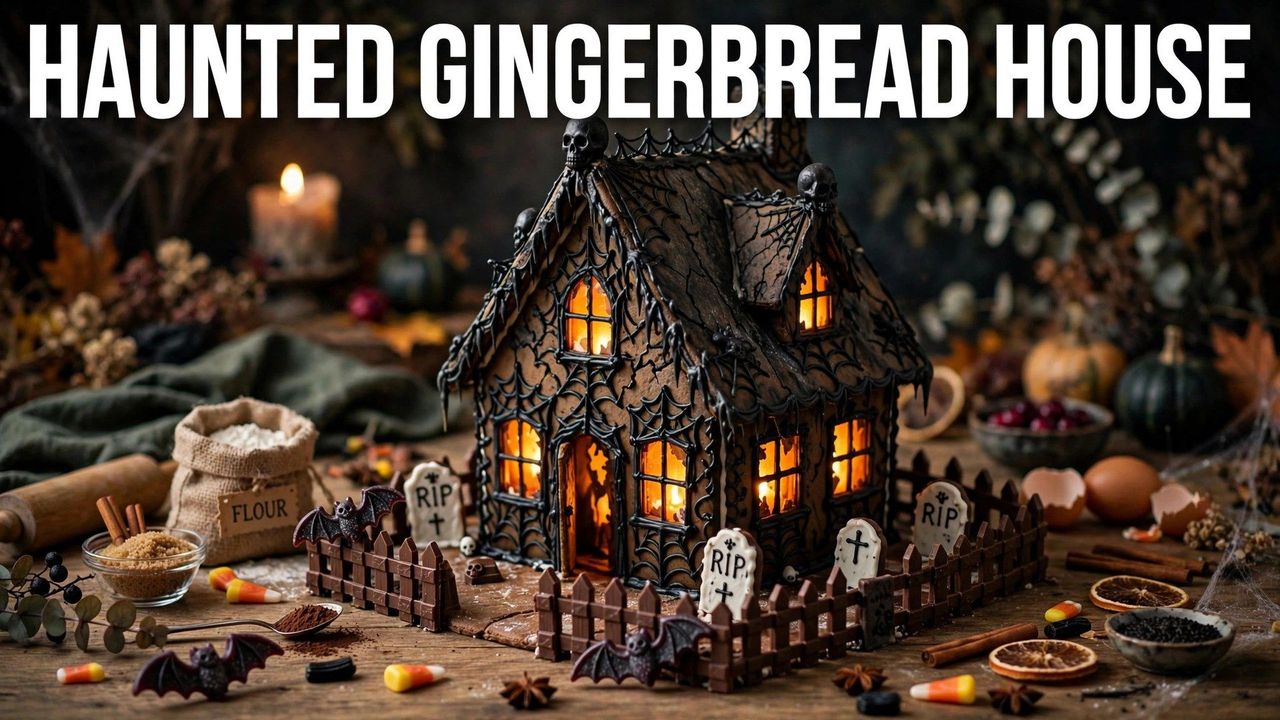
Who says gingerbread houses are only for December? The haunted gingerbread house is Halloween's most delicious craft project: all the cozy baking fun of the Christmas classic, reimagined with black icing, candy tombstones, and gummy bats. It is the rare Halloween activity that keeps kids busy for hours, produces a genuine centerpiece, and ends with everyone eating the decorations.
This 2026 guide walks you through the whole project: baking sturdy gingerbread (or choosing the right kit), assembling a house that does not collapse, spooky decorating ideas from haunted to hilarious, and the candy list that makes it all come together. Plan a weekend afternoon — this is a project, not a quick craft.
Kit vs. From Scratch: Which to Choose
Be honest about your ambition. Halloween gingerbread house kits — available every October from craft stores and supermarkets — include pre-baked panels, icing, and themed candy. They eliminate the two hardest parts (baking flat, even panels and getting the recipe right) and let you skip straight to decorating. From-scratch baking gives better flavor and sturdier walls, but requires a reliable construction gingerbread recipe (heavy on molasses, baked until truly hard) and a template. Recommendation: kits for kids under 10 and first-timers; from scratch if you love baking or want to eat the results proudly. Either way, buy royal icing mix — it dries rock-hard and is the structural glue of gingerbread architecture.
Baking Sturdy Gingerbread Walls
If you are baking, construction matters more than taste. Use a recipe designed for building (not soft eating cookies): high molasses, no leavening lift, rolled to a full quarter-inch thick. Cut pieces with a template on parchment, then bake until the edges are deeply browned and the centers feel firm — underbaked panels warp and collapse. Cool completely on the pans, then let them rest uncovered overnight; gingerbread hardens as it dries, and a day of drying makes assembly dramatically easier. Pro move: bake a few extra "shingles" and fence pieces for decoration and insurance against breakage.
Assembly: The No-Collapse Method
- Work on a sturdy base: a foil-covered board or tray that will be the permanent display.
- Royal icing is cement: pipe thick lines along every joining edge — thin icing is the number one cause of collapse.
- Build walls first: assemble the four walls, prop with cans or mugs, and let set for at least an hour before adding the roof.
- Roof last: pipe icing along the top edges, set roof panels, and support with cans until fully dry (2–3 hours or overnight).
- Hot glue option: for display-only houses, a hot glue gun is faster and stronger than icing — just do not eat those seams.
- Chimney caution: the chimney is the classic collapse point. Keep it small and let everything else set first.
Spooky Decorating Ideas
This is where Halloween beats Christmas. Think haunted, not cute:
- Black and purple icing: flood the walls dark, then add orange and green details. Food coloring gels give the deepest colors.
- Candy tombstones: grey-frosted Milano or shortbread cookies with "RIP" piped on, stuck in green-tinted coconut "grass."
- Gummy bats and worms: pressed into icing on the roof and walls, or "crawling" up the sides.
- Pretzel fences: stick pretzel rods in a row with icing "nails" for a crooked haunted fence.
- Glowing windows: cut window holes before baking, back with yellow tissue paper, and place an LED tea light inside.
- Chocolate "dirt" yard: crushed chocolate cookies around the base with candy pumpkins and skeleton figures.
- Cobweb icing: pipe white concentric circles on the roof, then drag a toothpick through for webs.
The Ultimate Haunted Candy Shopping List
- Structure candy: pretzel rods (fences, logs), wafer cookies (shingles), rock candy (crystals).
- Decor candy: candy corn, gummy bats, jelly eyeballs, sour worms, chocolate rocks.
- Icing colors: black, orange, purple, and green gel colors plus white royal icing.
- Figures: small plastic skeletons, ghosts, or witches for the yard (remove before eating).
- Finishing: edible glitter, black sanding sugar, and shredded coconut tinted green.
Buy 50% more candy than you think you need. Half of it will be "quality tested" during decorating — this is a feature, not a bug.
Making It a Family Project
The haunted gingerbread house shines as a group activity. Assign roles by age: little kids sort candy and press decorations into soft icing; older kids pipe details and build the yard; adults handle assembly and the hot elements. Put on a Halloween playlist, lay down newspaper (this gets messy), and give everyone their own small section to decorate — or build one house per child from mini kits for zero arguments. Photograph the finished house in the dark with its LED tea light glowing inside; it is genuinely magical. Then set a demolition date — the ceremonial smashing and eating is the best part, ideally on Halloween night itself.
Mini Houses & Creative Variations
Once you have mastered the classic house, branch out. Mini gingerbread houses — made from graham crackers or small baked panels — give every kid their own to decorate, ending the sharing wars. Build a gingerbread haunted village: three small houses plus a chapel with a candy cemetery between them. Try a gingerbread coffin cookie box filled with treats, or gingerbread tombstone cookies stuck into chocolate "dirt" cake. A haunted gingerbread train, with candy wheels and a licorice smokestack, delights younger kids. These smaller projects use the same royal icing and candy stash, take a fraction of the time, and let everyone take their creation home.